This is part 3 of my posts about some of my favorite vintage film cameras. Read part 1 here, and part 2 here.
Leica M3


*click to enlarge images
About The Leica M3
Without a doubt the Leica M3 is simply one of the most iconic cameras ever made. The M3 has served photojournalists, street photographers, and just about every other type of photographer you can think of from its introduction in 1954 right up until today. Not only are they beautiful, but they’re extremely well made and reliable, and that’s why they’re still being used in large numbers. The M3 set the standard for what all Leicas would be from then on.
Leica’s first departure from screw mount cameras, the M3 introduced the M mount (which is still the same lens mount used to this day), the famous flip up back for film loading, combined the slow and fast shutter speed dials of previous Leicas into one dial, and combined the viewfinder and rangefinder into one window. Previously, you had to look in one hole of the viewfinder to focus the rangefinder, and then into another to compose. To add to that, the M3’s viewfinder was big and bright with a .92x magnification and so it completely changed the game. The M3 viewfinder also introduced automatic frame lines that would change when a different focal length lens was mounted. One downside to the high magnification of the viewfinder is that, while it may be perfect for 50mm lenses, it is not suited to wide angle lenses, and so because of this you will find that many of the 35mm lenses of the time come with attached “goggles” which enables you to use the built in viewfinder. Many people find the M3 viewfinder to be one of the best ever made.
The M3 underwent numerous changes from 1954 until its discontinuation in 1966. At the time the M3 was introduced the IIIg was still in production, but the M3 made it essentially obsolete. The earliest M3 cameras used a piece of glass as the film pressure plate, and it was possible under certain circumstances for the glass to build up a static charge, the release of which would expose the film. Later models replaced this with black aluminum. Earlier M3’s also used a double stroke film advance which would require two shorter movements of the film advance lever to advance to the next frame as opposed to the one long movement you’re likely used to. Later versions changed to a single stroke. It’s also worth mentioning that many older M3s have already been converted, and so they have the aluminum film pressure plate and single stroke film advance lever though they wouldn’t have originally. This update was offered as a service by the factory and can still be done today. A few more small changes: early film strap lugs were an upside down tear drop shape, with later ones being half circles. Later models also introduced a lever on the front of the body under the viewfinder which would allow you to change the framing lines in the viewfinder to pre-visualize framing with different focal length lenses. Also, earlier models used shutter speeds of 1/5, 1/10, 1/25, 1/50 and 1/100 sec. while later models changed these to the more modern 1/4, 1/8, 1/15, 1/30, 1/60, and 1/125 sec. And of course there were several other internal and external changes made over the years.
Though the M3 is named with a 3, it was actually the first of the M series cameras with the M2 and M1 coming later. In general it’s suggested that you buy an M3 with a serial number above 1 million as those cameras have all the ultimate upgrades and improvements that the M3 would see throughout its lifetime, and because of that those tend to be more expensive. It’s always worth checking though, because many lower serial number cameras (mine included) have already had many of the factory upgrades done to it. In any case, whatever M3 you buy you’re getting an absolutely classic camera.
Ricohmatic 44


*click to enlarge images
About The Ricohmatic 44
The Ricohmatic 44 was introduced in the late 1950s as an easy to use TLR using 127 film. It produced 4x4cm images, which is where it gets its name. One advantage of the 4×4 format was that it would produce slides that were the same overall size as 35mm slides, and thus people could use their standard slide projectors, but the actual image was larger than 35mm.
The Richomatic came along around the same time a group of other 4×4 TLRs did such as the Minolta Miniflex and Gray Baby Rolleifelx seen here and the Yashica 44 seen here. It had a built in selenium meter and used a simple color coded system for setting exposure. It had a unique, transparent front cover that was held in place when the hood of the waist level finder was closed but then released automatically upon opening the hood.
The Rochomatic 44 only lasted a few years and isn’t a widely known camera, but it’s none the less a beautiful one.
Linhof Technika 70


*click to enlarge images
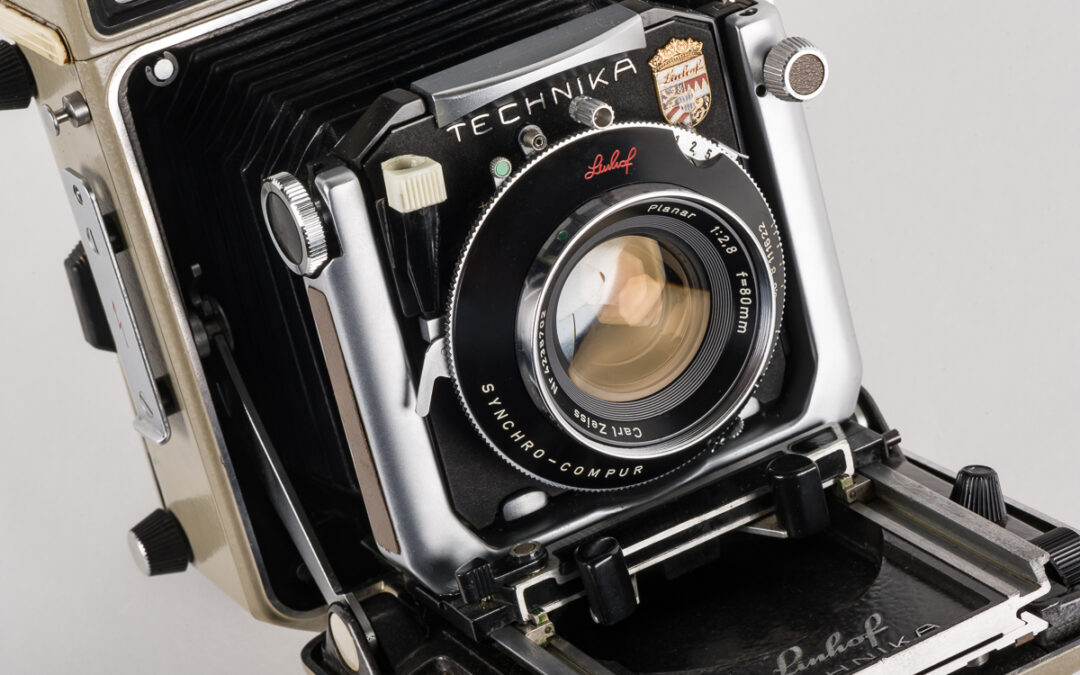
About The Linhof Technika 70
The Linhof Technika 70 is a hybrid medium format press and field camera. For press use it has a built in rangefinder that couples with up to 3 lenses at a time. For field use it has a ground glass back and versatile front and rear standard movements that make it quite close to a view camera. There are so many interesting things about this camera it’s hard to know where to begin. I’ll start by saying that, like anything else with Linhof written on it, the Technika 70 is one extremely well made piece of equipment.
The rangefinder is oriented vertically rather than horizontally. While this seems strange at first it makes sense in context of its intended use as a press camera. Since most people would be using it for magazines and newspapers, the vertical format was preferred. The rangefinder provided easy focusing, accurate framing, and overall quick use when shooting for publications.
The rangefinder was coupled to the lens for accurate focusing. The camera came in two different versions. One version has a rangefinder which contained frame lines for 65mm, 100mm, and 180mm lenses while the other came with frame lines for 53mm, 80mm, and 180mm lenses. The camera uses a three lobed metal cam which screws into place under the lens, and this cam is what is used to couple the lens and rangefinder. While you could add additional lenses after the original purchase, the lens would not be properly coupled to the rangefinder without sending the camera, cam, and lens to the factory. The factory would mill the cam appropriately and install infinity focus stops on the bed. When a cam was customized for a particular camera that camera’s serial number would be engraved on the bottom of the cam. Then, when it was customized for a particular lens, the lens’s serial number would be engraved on top of the corresponding lobe of the cam. Thus, this provides a way to tell what lenses came with a camera originally, or at least which ones were part of a properly calibrated camera system at one point. If you have a camera whose cam serial number on the bottom matches the camera serial number then you know it came with that camera. If you have a cam whose 80mm lobe has a serial number that matches your lens serial number, then you know it was properly adjusted for that camera. If you have a cam with a 53mm lobe, but no serial number engraved, then the original owner either never purchased a 53mm lens, or if they did they never had it properly adjusted for the camera. The focal length embossed on each lobe had a unique color, and the corresponding infinity stops had a line of the same color, and that’s how you know where to place the front standard for accurate infinity focus with a given focal length lens.
The Technika 70 can also double as a field camera. It has extensive front movements, and the front rise is even geared. It’s a beautiful thing to move the front standard up and down with the simple turn of a knob, and it stays in place. It also has limited rear movement and a rotating back for both horizontal and vertical composition, and the focusing screen contains a fresnel lens which aids in focusing. So it could be used for landscape, product, and to some degree architectural photography. To make it even better, the rotating ground glass back can be removed and Linhof roll film backs put in its place. That means you can shoot 2×3 sheet film (which is no longer made), 6×7 120 film, or 6×9 120 film all on the same camera and even change them from frame to frame. You can even get multiple backs and shoot multiple types of film at the same time.
On top of that, it’s just one beautiful camera. I could go on and on, but suffice it to say the Linhof Techinka 70 is quite the well made, versatile camera.
Mamiya 7


*click to enlarge images
About The Mamiya 7
I love cameras, and so it’s really hard to pick favorites. I’ve often thought to myself about what I would keep if I was only able to have a small number of them, and every time the Mamiya 7 makes the cut. I like it that much, and that’s why it’s on here even though it is on the newer side relative to most of the cameras I post about.
The Mamiya 7 has a lot going for it. It shoots big, beautiful 6x7cm negatives but is smaller and lighter than many DSLRs making it easy to have with you all the time. It has a built in meter and you can use it fully manually or in aperture priority mode. On top of that, the 65mm and 80mm lenses are some of the sharpest lenses made by any manufacturer for any format. You can just get amazing detail in the negatives. It’s an otherwise rather simple camera. One potential downside is that it is an electronic camera and thus depends on batteries. If your batteries die, your shutter isn’t firing.
Two things that help keep the size down are its rangefinder style and the fact that there is no shutter in the camera. The system utilizes leaf shutters in the lenses themselves. While the system offers a range of lenses, only the 65mm, 80mm, and 150mm lenses have frame lines in the viewfinder. The 43mm and 50mm lenses don’t have frame lines and so you must use an external finder to properly frame those, but they do couple with the rangefinder, so you can still use the built in viewfinder for proper focus. The 210mm lens does not couple with the rangefinder and has no lines in the viewfinder. This means you have to frame with an external finder, and focus based entirely off of the distance your subject is away from you. It’s not a fast or easy lens to use.
Some people use the built in viewfinder for framing with the 50mm lens saying that the overall entire image in the finder is a decent approximation of the 50mm angle of view. One issue with this is that, while the frame lines offer parallax correction for the 65mm, 80mm, and 150mm lenses, you won’t get it with the 50. The framing stays the same no matter where you’re focusing. So there’s a trade off, less accurate framing but no extra viewfinder, or carry an extra viewfinder but have more useful frame lines.
A common decision people have to make when getting a Mamiya 7 is whether they want to go with the 65mm or 80mm lenses, and of course much of this comes down to personal preference. After all, there really is not that much difference between their angles of view. The 65mm is roughly equivalent to a 32mm lens in 35mm format whereas the 80mm is roughly equivalent to a 39mm lens. That’s pretty darn close and many people have even questioned why they bothered making two lenses with such similar focual lengths. Having said that, there are some practical differences in my experience. For one, the 80mm is the smallest and lightest of all the Mamiya 7 lenses and so really adds to the overall appeal of the system. Related to that, the 65mm is longer and thus with the lens hood on interferes more noticeably with the viewfinder (though the 80mm does too to a small degree). The 80mm is also slightly sharper, though I will say when it comes to these two lenses I truly don’t think it matters, they’re both incredibly sharp. The 80mm can also frequently be found cheaper, though it’s getting to the point where they’re both getting expensive. That’s all to say that I’ve stuck with the 80 and find it to be a great all around lens that works well from landscapes to half body portraits.
Another debate is between the Mamiya 7 and 7ii. This again is largely personal preference. The 7ii comes in all black, has a multiple exposure switch (which the 7 doesn’t) and a slightly updated viewfinder which introduces a polarized lens to the rangefinder. Is it technically better? Sure. Is it significantly better? Well, I got the Mamiya 7. Especially today when prices are seemingly going up by the day, I personally think the 7 is the better value, but of course you can’t go wrong with either of them.
Rolleiflex SL26


*click to enlarge images
About The Rolleiflex SL26
The Rolleiflex SL26 may look different from what most of us think of when we think Rolleiflex, but it is similar in one key way: when Rolleiflex made something it tended to be among the best. And the SL26 is probably the nicest camera ever made for the otherwise cheap-platic-camera-dominated 126 film market.
The SL26 had three interchangeable lenses and was a true SLR. Similar to the Kodak Retina IIIC I wrote about earlier, the interchangeable lenses are more accurately described as interchangeable front lens elements. The rear elements behind the aperture stay the same. All in all, it was a higher end camera made for a mostly consumer based film format, and seeing as it was expensive, there aren’t that many out there relative to most 126 film cameras.
Graflex Speed And Crown Graphic


*click to enlarge images
About The Graflex Speed And Crown Graphic
It would be hard to overstate the importance of Graflex cameras in the history of photography. They were at one time the main cameras used by journalists. They have been used to cover some of the main events in human history and to take some of the most famous photos the world has seen. Well beyond journalism, they’ve been used extensively for just about every style of photography you can think of.
While the Speed Graphic is an iconic camera, it is anything but speedy. The name comes from the highest shutter speed it can utilize which is 1/1000sec. and was indeed fast. But getting the camera to the point that you were ready to take a picture took a lot of effort. Imagine being a press photographer using a 4×5 view camera. Often shot using sheet film, you could also adapt a roll film back to the camera. The roll film backs take 120 film and so you can still use them today. Furthermore, the manner in which the back connected to the camera, called a Graflok back, became the industry standard for the way backs attach to cameras and it is still used to this day.
The Speed Graphic and Crown Graphic look very similar but differ in a key way: Speed Graphics have a focal plane shutter, Crown Graphics do not. This means that a Crown Graphic can only use a lens with a built in leaf shutter while a Speed can use about any lens you can mount to the camera. Though available in a range of sizes the most popular were 4×5 and 2 1/4x 3 1/4. In the above photos the Speed Graphic is a 4×5 and the Crown is a 2 1/4 x 3 1/4 with a roll film back attached. The Pacemaker model is typically what most people know and that is what is pictured above.
Graflex.org is a great resource for identifying your Graflex and finding out as much information about them as is available.
Mamiya C220


*click to enlarge images
About The Mamiya C220
The Mamiya C220 is a straightforward, reliable TLR made in the 1970s. Though larger than many other TLR systems, such as the Rolleiflex, it features interchangeable lenses as well as a bellows system which allows it to focus much closer than most, and that all adds up to quite the versatile camera system.
The 220 was one of the final versions of the system and existed along side the C330, and thus it’s common for people to be left trying to choose between the two. I have a C220 for sentimental reasons. It was the first TLR I ever owned. But you can’t go wrong with either of them. The main advantage, in my opinion, is that the C330 resets the shutter as you are advancing the film all with one lever. On the C220 you have to reset the shutter on the lens manually. Forgetting to do that has led to a lot of accidental multiple exposures, many of which are happy accidents. Having said that, you can often get the C220 much more affordably and it will give you the exact same results as the C220 and C330 use the same lenses.
Kodak Rainbow Hawkeye No. 2A Folding Model B


*click to enlarge images
About The Kodak Rainbow Hawkeye
The Kodak Rainbow Hawkeye No. 2A Folding Model B is a simple bellows camera made by Kodak in the early 1930s. It takes 116 roll film. Though otherwise a pretty simple camera, it came in a variety of colors, blue, black, old rose, brown, and green that sought to be attractive to the general public.
What Am I Missing?
OK, three posts into this now I’d love to know what I’m overlooking. Do you think there’s something I should add? Did I get something wrong? Do you completely disagree with something I included in the list? I’d love to hear about it! Comment below or reach out to me directly and let me know what you think. And thanks for reading!
I seem to recall finding this (or a similar) site and subject. Essentially featuring cameras as object d’art much as you have done here…. I thopught this must be the place, but the camera featured (among others) was the Vito II. Maybe it’s in a gallery I missed?? Possibly it wasn’t this site…but it feels right!
Well if you didn’T post thiws camera… maybe you should? 🙂